So, the other day, I was checking on my specimens (a good thing to do as part of regular maintenance of a collection) and I saw that a sphinx moth I had collected a couple of years ago had become stained with grease. I'm not sure exactly when this would have happened. I have had this specimen for a couple of years and it was fine the last time I checked it (a few months ago). Anyway, as some of you out there may or may not know, dead butterflies and moths can occasionally become stained with grease. The abdomens of many species contain fat reserves, and when the insect dies, the fat can decompose and liquefy, and then it seeps out of the abdomen and can track along the wings and stain them. This leaves the wings discolored and can also give them a shiny greasy appearance. No one knows what exactly triggers this process, and it certainly doesn't happen for every specimen (probably a minority overall). It can happened soon after the insect dies, or sometimes as in my case, years later. Some species are more prone to this phenomenon than others though. Many of you may have noticed that quite a few of the Morpho specimens sold these days have their abdomens missing! When I was younger, I wondered why this was the case. I later found out that the abdomens are removed on purpose to prevent this staining phenomenon.
So, when this happens, can anything be done? Is the specimen permanently ruined? Well, as it happens, the specimen may be salvaged most of the time by degreasing in an organic solvent. If one does a search for this on the internet, you'll see that many solvents have been tried and are recommended, and there are advantages and disadvantages to many. I'm not sure there is a single best chemical agent for the job. Some commonly recommended chemicals are acetone, diethyl ether, toluene, xylene, and even gasoline. Many of these chemicals are either toxic when inhaled and/or very flammable. Some may be difficult to obtain for the average person.
I think acetone is the mostly commonly used because it's relatively safe and easily obtained. It's used for a variety of commercial purposes and can be easily located in most home hardware stores. The fumes are not very toxic (though limiting exposure is always a good idea), but they are very flammable, and so care must always be taken when working with acetone. Diethyl ether is probably a better agent for degreasing specimens, but the fumes are also very flammable and if stored for a long period of time, the ether can spontaneously form explosive peroxides. For the average person, I don't think xylene or toluene are easily obtained, although I have read that xylene is better than acetone or diethyl ether for degreasing.
For my purposes, I obtained a can of acetone from a local hardware store. I have never done this before and was a bit concerned about how well it would work and whether it might damage my specimen in the process. However, my sphinx moth specimen was badly stained anyway, and I figured, how much worse could it get? I read up on this procedure as much as I could and decided to just give it a go and see what results. It is generally recommended that this be done in a well ventilated area, and some people do this in their yard or garage. I decided to do this in my kitchen of all places and my ventilation was in the form of the kitchen fan on maximum, and it actually worked quite well. Acetone should be contained in glass or metal, as it can dissolve some plastics. You should also make sure that anything it can potentially damage near by is covered up (like the kitchen counter). Now, I wasn't sure what to expect at this point, and so I didn't take any before and after photographs, or document my set up, so I'll just try to be as descriptive as I can.
I poured the acetone into a glass bowl, and set both the can of acetone and the bowl on a flat metal baking tray on the kitchen stove. The fan had already been turned on at this point. You can certainly smell the acetone fumes (sort of a fruity smell) when you're directly over the open bowl, but as soon as I stepped away, the fumes were no problem. Make sure the stove is off of course! Next, I just took the specimen and completely immersed it in the acetone bath. I took off the specimen label first because the acetone can dissolve the ink sometimes. Some sources out there will say that the acetone can damage the insect pin, but I think this only happens if you're leaving your specimen in acetone for a long time, like a day or so. I had no problems with this but I only left my specimen in the acetone for about an hour. After the specimen was immersed, I covered the top of the bowl with a lid and just left it sitting (acetone evaporates very quickly). It should also be noted that acetone is less dense than water,
and so if you don't suspend the specimen, it will just sink to the
bottom of the container. For larger specimens with quite a bit of weight, it may therefore be a good idea to attach a piece of cork or similar object to the bottom of the lid, and then pin the specimen there so that it's suspended in the acetone once the lid is put on the container. That way, parts of the specimen will not touch the container and one decreases the risk of damage from the weight of the specimen resting on a wing edge for example.
When placing the specimen in the acetone, I was wondering if there
would be a lot of surface tension. If you try to push a specimen into a
bowl of water, you'll see it's actually not that easy, and the water
doesn't easily wet the wings (a good thing when the insect is alive in
nature). I had read some warnings that surface tension might break delicate parts of insects if this isn't done carefully (like tails on swallowtails or antennae). However, the acetone wetted the whole specimen easily. I intermittently swirled the bowl of acetone gently to
help circulate the acetone around, but you have to be gentle so the
specimen doesn't bump around the bowl and get damaged.
It's difficult to say how long one should leave a specimen in the acetone bath. Some say 10 minutes will do, while others treat the specimens for days using multiple acetone washes. This probably comes with experience, and I'm sure it also depends on how much grease there is in the specimen to begin with. For small specimens where there isn't much grease, an hour will probably do. Big saturniid moths may take days I suppose. The sphinx moth I had wasn't exactly small, but I found about an hour was actually enough, and there was no visible grease left nor damage to the insect pin. I think those who degrease for days are trying to dissolve all the grease from the insect body so that not only is the specimen clean, but there's no chance the specimen will be stained again in the future. While that would be great, I decided to just do the minimum and not risk any damage to my specimen given that this was my first attempt. Besides, this degreasing process can be repeated as often as necessary.
So after about an hour, I lifted the lid and gently took out the specimen. The wings and body had a wet look and it was hard at this point to tell whether the treatment worked. I held it close to the kitchen fan and also gently blew on the moth specimen. This helps the acetone evaporate faster, but the other reason I did this is because I read that sometimes hairs on the body and wings of insects can remain matted even after the acetone evaporates, and that having a light breeze during the drying process can help prevent this sequela. It worked perfectly and within a couple of minutes, the specimen was dry. I saw no trace of grease left on the body or wings - the specimen looked brand new! Some sources warn that the specimen may become loose on the pin or that
the wings may move and require re-setting after degreasing, but again, I
didn't find that an issue after such a short duration.
During the course of my research, I also read that because the acetone evaporates quickly and can also further dehydrate specimens which aren't fully dehydrated, it can sometimes cause the wings to wrinkle, especially wing tips. This didn't happen with my sphinx moth which was already a couple of years old and probably thoroughly dried. However, I subsequently tried the process with a fresh unpinned specimen and I did observe this phenomenon. I used a Papilio polyxenes asterius and the tails on the hind wings became curved and brittle, and when I subsequently tried to flatten this out, the tails broke. So, I think the lesson here is, if you're degreasing an old specimen it probably doesn't matter too much. If you have a newer specimen, you can either wait it out a bit or take your chances.
Some sources out there recommend degreasing as a preventative measure rather than addressing the problem after occurs. For this, to avoid badly dehydrating the specimen as mentioned above, what one would do is remove the abdomen, degrease it really well over days, and then glue this back on to the rest of the specimen after it has been spread. That way, there's no chance anything will be stained in the future. I suppose one can do this for every specimen, but I imagine it can be time consuming. One last thing I should mention is that I also read that for species containing green colors, if that is discolored by grease, the degreasing process cannot retrieve that color. I'm not sure why this is the case, and I don't have personal experience of this to comment further. I certainly have seen examples of blue morphos that have been degreased wherein the blue iridescence was brought back.
After the degreasing is complete, one is left with a bowl of acetone to dispose. I didn't just pour it down the drain because I wasn't sure if it would dissolve some of the plastic piping or not. A better idea is probably to just let it evaporate on its own. Some people suggest just leaving it in the back yard to evaporate - a good idea but you first need to make sure it's in a location not accessible to children, pets, wildlife...etc. A protected environment like the garage is probably also not a bad place to leave the acetone. You just have to open the door and air out the garage later on before use. I decided to leave my bowl of acetone in the garage. After a couple of days, the vast majority of the acetone had evaporated (probably the volume of a can of pop). What was left behind was a bit of acetone mixed with the dissolved body fats from my specimen. At this point, I could barely smell any acetone, and I just washed the bowl and poured the contents down the drain with lots of water, with no apparent ill effect. So, that was my first experience degreasing a specimen, and I feel quite pleased with how things turned out!
Wednesday, 24 December 2014
Monday, 7 July 2014
Papilio glaucus glaucus
Papilio glaucus is commonly known as the Eastern Tiger Swallowtail, and is one of the most common and easily recognized butterflies in North America due to its contrasting yellow background and black stripes resembling those of a tiger. This species is found in the eastern half of the USA and extends into southern Canada reaching as far as Ottawa, Ontario and parts of southern Quebec. There are two subspecies: maynardi in central and south Florida and glaucus in the rest of the range. These two entities fully intergrade in Florida, but there are demonstrable morphologic and physiologic differences between the populations (see PhD dissertation by Matthew Lehnert, University of Florida, 2010). In Canada, there is a closely related sister species, Papilio canadensis (Canadian Tiger Swallowtail), which was once considered a subspecies of Papilio glaucus. However, nearly 25 years ago, they were separated as being different species based on a number of characteristics including morphology, food plant use, and biochemical/molecular analysis. I'm currently raising some Canadian Tiger Swallowtail larvae, and will write a more detailed entry on this species in the future. There is a thin zone of hybridization between glaucus and canadensis where their ranges meet, and anecdotal evidence suggests that this zone has been moving northward in recent years, likely due to climate change. In Ottawa, Ontario for example, Papilio glaucus was once very rare, but is now regularly seen.
Papilio glaucus is one of the most polyphagous swallowtail species known, meaning that its larvae will feed on numerous types of host plants, as opposed to being restricted to just one or a few species. There are so many that I am not going to list them all, but some common ones include cherry, tuliptree, and ash. I typically find ova and larvae on tuliptree (Liriodendron tulipifera), but I'm biased because I really don't focus on the other potential host plants. The green eggs are spherical, about 1 mm across, and laid on the tops of leaves. One time, I also found an egg on hoptree (Ptelea trifoliata) incidentally, which is a known host plant for this species.

After hatching, the caterpillar is black with a white saddle across its mid section, making it resemble bird poop. There may also be a very small patch of white near the back end of the caterpillar.

The larva goes through 5 moults, and the stage between each moult is known as an instar. So after hatching from the egg, you have a 1st instar larva. After the first moult, it has reached the 2nd instar, pictured below. As you can see, it's not dramatically different in terms of overall color, but just larger that's all.

Starting from the 3rd instar, one begins to notice some color changes. The larva becomes just a bit more green and mottled, and there are also now noticeable blue spots placed transversely along some segments. The second picture below also shows the caterpillar's osmeterium. This is an eversible organ that the caterpillar displays when disturbed. It emits a rather pungent odor, and is meant to ward off potential predators. In fact, it is a defining feature of all larvae of the swallowtail butterfly family.


The 4th instar larva is now mostly green but you can still see a remnant of the white saddle it had as a 1st instar larva. You can also see that the larva now has fake eye spots behind its actual head, which is tucked close to the leaf. The green color helps the larva blend in with the foliage, but should it be discovered, it's believed that the fake eye spots may provide some additional protection by startling the predator. Perhaps the caterpillar is trying to mimic a small snake or lizard. In the second picture, you can see the larva just before moulting into a 5th instar caterpillar. The old head capsule is translucent and you can see the new head which has formed just above it.


The 5th instar larva is almost totally green, and it's quite a beautiful color. It can reach up to about 4 cm in length. It no longer has even the slightest hint of the white saddle. The second picture again offers a good look at the fake eye spots and how a predator might view the caterpillar in its resting position. It certainly looks a bit mean in that pose!


Many swallowtail species have pupae which can take on different colors depending on the season, often being green in the summer but brown if they are formed during the fall so as to resemble twigs and bark rather than green leaves. Curiously in Papilio glaucus, all the pupae are brown no matter what generation produced them.

These pupae measure just over 3 cm long. If the larva was exposed to warmer temperatures and more daylight during development, the pupa will develop to an adult butterfly which will emerge in about 2 weeks. Otherwise, lower temperatures and shorter days signal to the larva that winter is approaching, and the pupa will go into hibernation (also known as diapause) and emerge the next spring. Below is a newly emerged male Papilio glaucus.

Pictured below are a pair of males (dorsal and ventral) and females (dorsal and ventral). Notice that relative to the male, the females have broader black stripes as well as more blue on the hind wings (usually more blue than this even). Females Eastern Tiger Swallowtails are dimorphic, which means they come in two forms. The pictures below show the regular yellow form, but there is also a form that is nearly totally black except for the submarginal yellow spots. These are known as melanic females and they have a large suffusion of blue on the hind wings, providing a pattern which mimics the distasteful Pipevine Swallowtail (see earlier post). I do not have specimens of this form, but they are common in areas where the Pipevine Swallowtail is also common. Melanic females are not usually found in Papilio canadensis, but extremely rarely an aberration or mutant may occur.

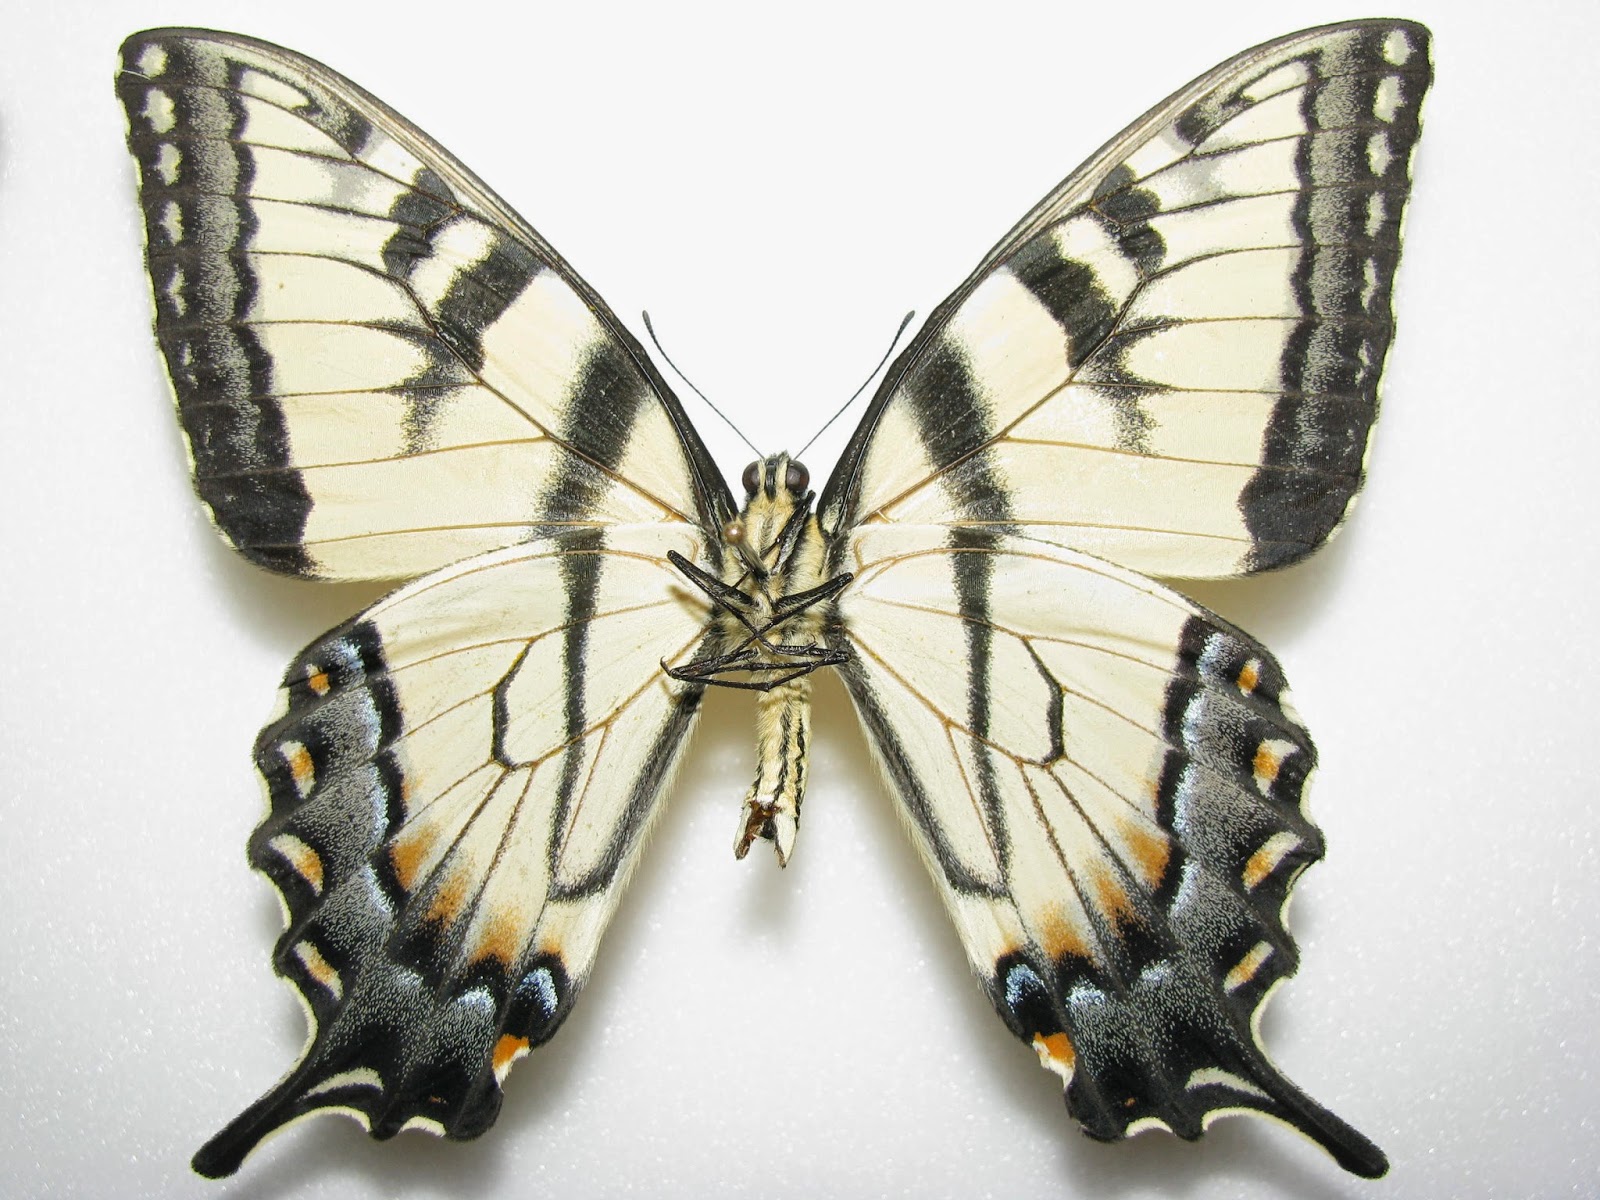

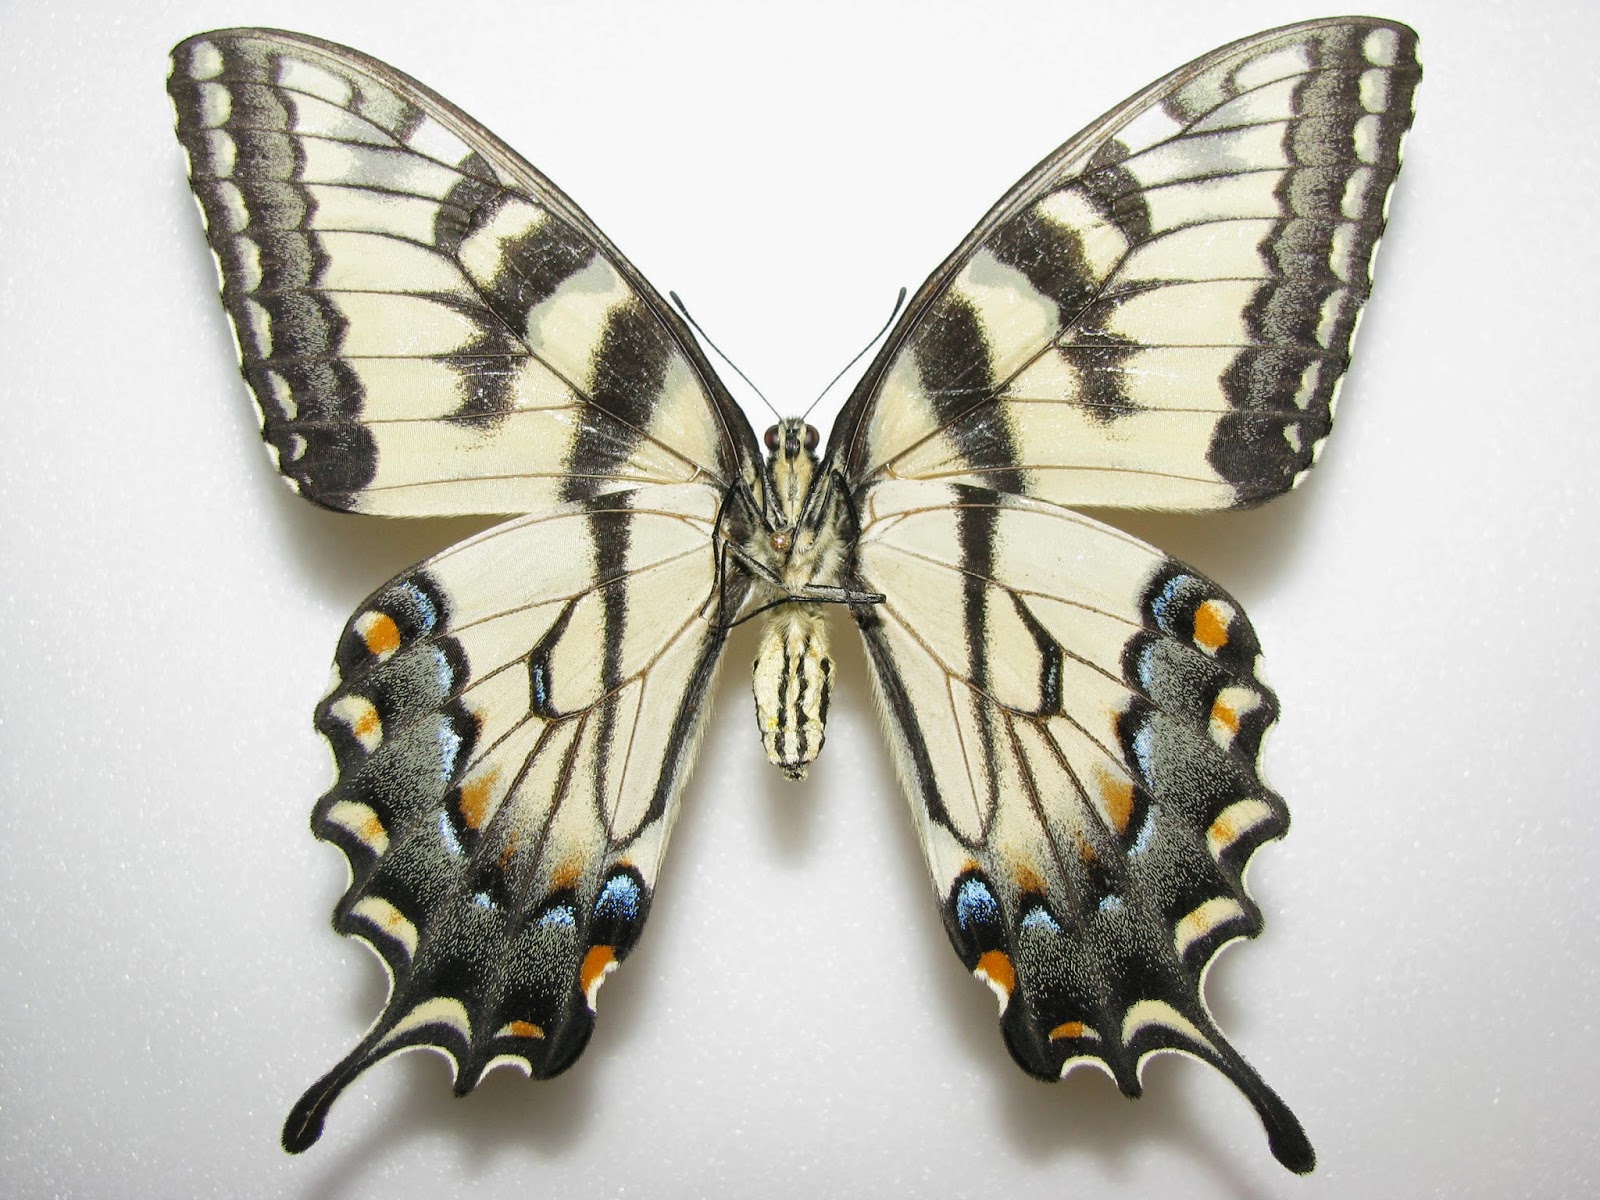
It can be difficult to distinguish Papilio glaucus and canadensis, especially on the wing. Many sources will say that Papilio glaucus tends to have a larger wingspan as well as a deeper yellow color with an orange tint, but these characteristics are quite variable. A more useful and consistent feature is the width of the black band along the anal margin of the hind wing, which is generally less than 50% the width of the anal wing cell in glaucus and broader in canadensis. Additionally, if one looks at the submarginal row of yellow spots on the under surface of the forewings, they are discrete spots or lunules in Papilio glaucus but form a contiguous straight band in Papilio canadensis. In the larval stage, 1st instar caterpillars for Papilio glaucus have a white saddle centrally and perhaps just a bit of white near its rear end, while 1st instar Paplio canadensis larvae have two additional distinct patches of white in addition to the white saddle located at the front and rear. I will have more on these features when I write the entry on the Canadian Tiger Swallowtail. Near the hybridization zone of course, the picture gets complicated with hybrids that show a spectrum of features. To add more confusion, "spring brood" Papilio glaucus (those which hibernated through winter) can have greater anal band widths than individuals which did not hibernate and can resemble Papilio canadensis in other wing characteristics.
Papilio glaucus is one of the most polyphagous swallowtail species known, meaning that its larvae will feed on numerous types of host plants, as opposed to being restricted to just one or a few species. There are so many that I am not going to list them all, but some common ones include cherry, tuliptree, and ash. I typically find ova and larvae on tuliptree (Liriodendron tulipifera), but I'm biased because I really don't focus on the other potential host plants. The green eggs are spherical, about 1 mm across, and laid on the tops of leaves. One time, I also found an egg on hoptree (Ptelea trifoliata) incidentally, which is a known host plant for this species.
After hatching, the caterpillar is black with a white saddle across its mid section, making it resemble bird poop. There may also be a very small patch of white near the back end of the caterpillar.
The larva goes through 5 moults, and the stage between each moult is known as an instar. So after hatching from the egg, you have a 1st instar larva. After the first moult, it has reached the 2nd instar, pictured below. As you can see, it's not dramatically different in terms of overall color, but just larger that's all.
Starting from the 3rd instar, one begins to notice some color changes. The larva becomes just a bit more green and mottled, and there are also now noticeable blue spots placed transversely along some segments. The second picture below also shows the caterpillar's osmeterium. This is an eversible organ that the caterpillar displays when disturbed. It emits a rather pungent odor, and is meant to ward off potential predators. In fact, it is a defining feature of all larvae of the swallowtail butterfly family.
The 4th instar larva is now mostly green but you can still see a remnant of the white saddle it had as a 1st instar larva. You can also see that the larva now has fake eye spots behind its actual head, which is tucked close to the leaf. The green color helps the larva blend in with the foliage, but should it be discovered, it's believed that the fake eye spots may provide some additional protection by startling the predator. Perhaps the caterpillar is trying to mimic a small snake or lizard. In the second picture, you can see the larva just before moulting into a 5th instar caterpillar. The old head capsule is translucent and you can see the new head which has formed just above it.
Many swallowtail species have pupae which can take on different colors depending on the season, often being green in the summer but brown if they are formed during the fall so as to resemble twigs and bark rather than green leaves. Curiously in Papilio glaucus, all the pupae are brown no matter what generation produced them.
These pupae measure just over 3 cm long. If the larva was exposed to warmer temperatures and more daylight during development, the pupa will develop to an adult butterfly which will emerge in about 2 weeks. Otherwise, lower temperatures and shorter days signal to the larva that winter is approaching, and the pupa will go into hibernation (also known as diapause) and emerge the next spring. Below is a newly emerged male Papilio glaucus.
Pictured below are a pair of males (dorsal and ventral) and females (dorsal and ventral). Notice that relative to the male, the females have broader black stripes as well as more blue on the hind wings (usually more blue than this even). Females Eastern Tiger Swallowtails are dimorphic, which means they come in two forms. The pictures below show the regular yellow form, but there is also a form that is nearly totally black except for the submarginal yellow spots. These are known as melanic females and they have a large suffusion of blue on the hind wings, providing a pattern which mimics the distasteful Pipevine Swallowtail (see earlier post). I do not have specimens of this form, but they are common in areas where the Pipevine Swallowtail is also common. Melanic females are not usually found in Papilio canadensis, but extremely rarely an aberration or mutant may occur.
Subscribe to:
Posts (Atom)